Irish potatoes can be grown on a small scale in various kinds of containers, in any area that gets at least six or eight hours of direct sunshine. For people with very small gardens or just a patio or porch, growing potatoes in containers can be rewarding and productive. It's also a good way for children to try growing something they love to eat.
How Potatoes Grow
Potatoes sprout on short, stem-like stolons which are produced on the lower stems of potato plants as they grow. Potato plants are grown from mature “seed potatoes” which are usually cut into smaller, egg-size pieces, each with one or two “eyes” or stem buds. Because potatoes sold in grocery stores are often the wrong variety for home gardens or are treated to prevent sprouting, it is important to buy “seed potatoes“ from garden centers and online, which are labeled as certified to be free of diseases.
Potatoes require at least three or four months of cool weather to grow properly; hard freezes will kill the plants, while high temperatures (mid-80s F) cause the plants to stop growing or making tubers. Most gardeners plant in late spring – March through May, depending on your climate.
In addition to direct sunshine, the plants require a little fertilizer and occasional watering down deep around the roots, especially close to harvest.
To prevent young potatoes from being exposed to sunlight which can make them turn green, bitter and even poisonous, it is very important, as plants begin to grow, to keep the lower stems covered with mulch or fresh soil as they grow.
Step 1: Prepare the Potatoes
Cut firm, certified seed potatoes into small egg-size pieces, each with one or two “eye” or stem buds, and allowed to dry a day or two before being planted. Small potatoes can be planted whole. You may let the seed pieces sprout a little before planting, but this is not necessary.
Step 2: Prepare Containers
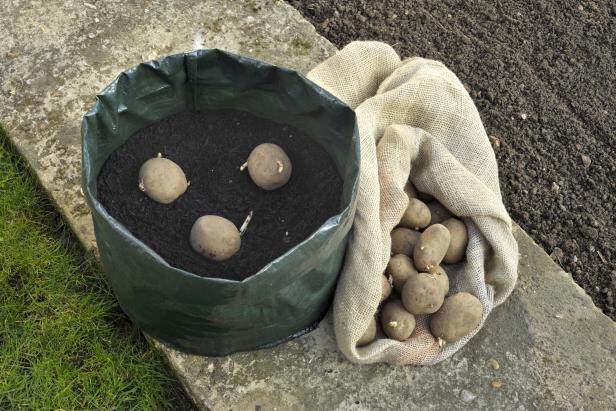
Any medium-sized container that holds at least 2 or 3 gallons of soil can be used. Examples include baskets, grow bags, large paint buckets, trash cans or even stacks of used car tires (no, they are not poisonous to plants or people). Make sure there are adequate holes for excess water to drain.
Fill the bottom of each container with a few inches of potting soil, which will be where potato roots will grow. Mix in a scant handful of all-purpose or organic fertilizer. Place the container where it will get sunlight but not too much radiated heat from a wall or patio.
Step 3: Plant the Seed Pieces
Plant three or four potato seed pieces in the soil – don’t crowd them – and water well to get the plants started. Continue to water as needed to keep plants moist, not wet.
Step 4: Cover Plant Stems as They Grow
Once plants begin to grow, gently pile new soil or mulch around the lower stems to keep them in total darkness. Continue weekly until the containers are almost filled. If using tires, just add more tires as needed, and fill them with fresh soil or mulch. Continue to water down deep around roots, but do not keep the plants wet.
Step 5: Harvest
Within three months you should be able to gently prod around the lower stems with your fingers for small new potatoes. Even the tiniest are very tasty. For larger spuds, leave the plants alone for about four months or until they start to turn yellow, whichever comes first. Simply turn the buckets over or remove tires to find all the fresh tubers you have grown.
Use small potatoes as soon as possible, but store larger ones in a cool, dark area for several weeks, checking regularly for shriveling or decay.